Over the last several years Microsoft has added more and more tracing points to the operating system for use in performance and problem analysis. While Vista collected an impressive amount of information that was available for analysis to the external community, the lukewarm reception of Vista from our customers prevented us from ever really getting a chance to play it. Fortunately, we’ve seen a bigger interest in Windows 7 that has caused us to take a look at the data that is available and how we might be able to use it. To that end, this article will focus on gaining access to these tracing points via the Xperf utility and interpreting the resulting data with the XperfView utility.
Getting the Tools
All of the tools discussed in this article are distributed as part of the Windows Performance Toolkit (WPT). While the WPT was previously a separately downloadable kit, it is now distributed only as part of the Platform SDK. Unfortunately, that means that you need to install the Platform SDK on some system someplace so that you can extract the WPT installer from the \Bin directory of the PSDK.
There are three installers that are dropped into the PSDK’s bin directory: wpt_ia64.msi, wpt_x64.msi, and wpt_x86.msi. All three packages will install both the performance capturing utilities and the data analysis utility, so you’ll want to install the package on both your target system and whatever system you expect to be doing your analysis on.
Basics of Capturing Data
Capturing data with Xperf is actually quite simple, though the staggering number of options can at first make the task daunting. We’ll cover some basic examples and that will hopefully provide you with enough confidence to experiment and really unlock the hidden power of the tracing present in Windows.
If you don’t have any experience with Event Tracing for Windows (ETW), just know that at its heart there are two players involved: trace providers and trace consumers. Trace providers provide a set of events,which are really just tracing points that they support. For example, a trace provider might provide a process creation event, which fires when a process is created and provides interesting information about the process. By default a trace provider’s events are all disabled and it is the job of the trace consumer to both enable these events and capture the data that they generate.
This is pertinent because there are trace providers existing in Windows that contain interesting performance and event data that we want to collect. Xperf is the trace consumer utility that we’re going to use to both enable those events and capture the data.
For the purposes of this article, providers come in two flavors: user mode and kernel mode. As the name implies, user mode providers generate events from user mode as a result of user mode actions and kernel mode providers generate events from kernel mode as a result of kernel mode actions.
Because Xperf is geared towards collecting performance related ETW data, the command line interface is really geared towards collecting kernel mode provider data. Specifically, Xperf is geared towards collecting information from the, “NT Kernel Logger” provider. This provider is supplied by the operating system itself and generates events for all sorts of interesting things, such as DPCs, ISRs, disk I/O, registry access, file access, etc. We can actually see all of the events available to us from this provider by supplying the –providers kf switch to Xperf (See Figure 1).
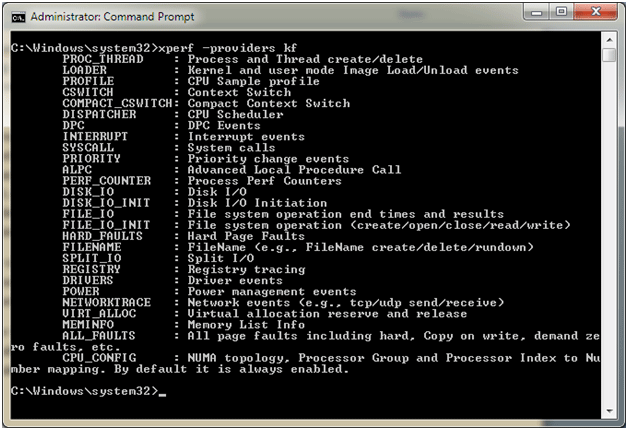
Figure 1 - Event Data Available for Collection
From here on we’ll focus on gathering kernel trace data and at the end of the article we’ll provide a brief overview of how to incorporate user trace provider data with your kernel traces.
Starting a Kernel Trace
Now we can begin to capture our first Xperf trace. The basic syntax that we’re going to use to initiate a trace operation is:
Xperf.exe –start “Provider Name” –on EventOne+EventTwo+EventThree –f LogFileName.etl
Since we’re interested in the O/S provided kernel trace points, our provider name will always be, “NT Kernel Logger”. In addition, the EventXxx in the above will be one or more of the event names that we saw in the –providers kf output (PROC_THREAD, LOADER, etc). Thus, if we wanted to begin a trace that would enable the DPC trace events in the system, we would use the following command:
Xperf.exe –start “NT Kernel Logger” –on DPC –f dpc.etl
If we were interested in adding interrupt service routine data to this log file, we could simply use the same command but provide another event in the –on options:
Xperf.exe –start “NT Kernel Logger” –on DPC+INTERRUPT –f dpcisr.etl
Unusual syntax? That’s a bit of an understatement. But, whatever. It seems to work once you know how to manipulate the options.
Because we typically want to capture multiple points of data at once, Xperf also provides a set of kernel event groups that are convenient shortcut names to use when enabling multiple kernel events at once. We can see the list of shortcut names with the –providers kg option (See Figure 2).
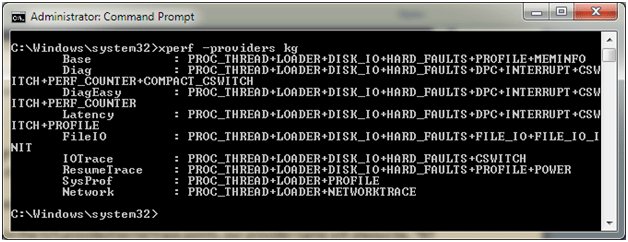
Figure 2 - "Groups" for Enabling Multiple Events
Using one of these when enabling a trace looks like the following:
Xperf.exe –start “NT Kernel Logger” –on IOTrace –f iotrace.etl
You’ll notice that in the above groups all options include both the PROC_THREAD and LOADER events. The documentation alludes to this in a few locations, but it is important to always include these two events in any kernel trace that you perform. Without both of these events selected the loaded module list will not be captured from the target machine, which will make it impossible to later perform symbolic analysis using PDB files. Thus, even if we are only interested in DPC and ISR event data our start command needs to be:
Xperf.exe –start “NT Kernel Logger” –on PROC_THREAD+LOADER+DPC+INTERRUPT –f dpcisr.etl
Stopping a Trace
Once you’ve started your trace, stopping the trace is a simple matter of running Xperf again and supplying the –stop switch and supplying the name of the provider:
Xperf.exe –stop “NT Kernel Logger”
This will stop the tracing session from generating events and properly close the ETL file specified on the command line. However, before we perform our analysis we will need to complete a merge step to add some critical system information to the generated ETL file. This step can be done with the –merge option, supplying the ETL file from our trace and an output file name that we will perform our analysis on:
Xperf.exe –merge dpcisr.etl dpcisr_final.etl
In this example, we direct xperf to perform a merge operation on the trace data that was collected in the file “dpcisr.etl” and place the merged output data into the file named “dpcisr_final.etl” – Simple, right?
We now have an ETL file with all of the data that was generated during the capture period plus some extra data that the tool needs to perform some auxiliary functions. You’ll find that the contents of the file itself aren’t all that helpful, which is why the next step will be to analyze the resulting file using XperfView:
XperfView.exe dpcisr_final.etl
Analyzing a Trace
Analyzing a trace is where the real work begins. The XperfView application will provide us an incredible amount of insight into exactly what our systems were doing during the test period. Depending on the type of data collected, the application will choose which type of graph best suits the data displayed. For example, for our DPC and ISR collection the application chooses a typical CPU usage graph to display our data, shown in Figure 3.
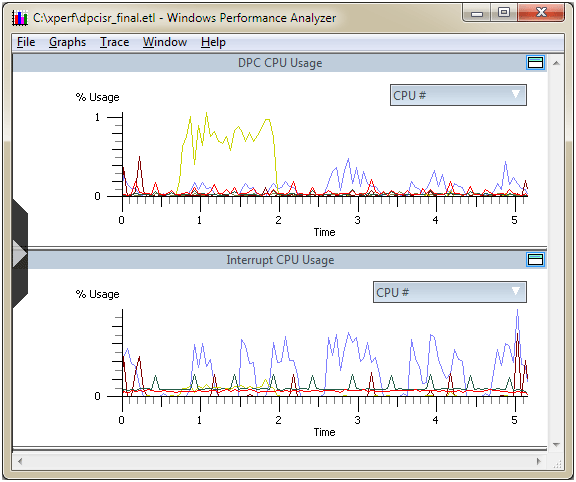
Figure 3 - Graph of the Data
If we would like to zoom in to a particular range of time, we can simply highlight an area on the graph by clicking and dragging. Right clicking at this point gives us access to the Zoom To Selection option (shown in Figure 4).
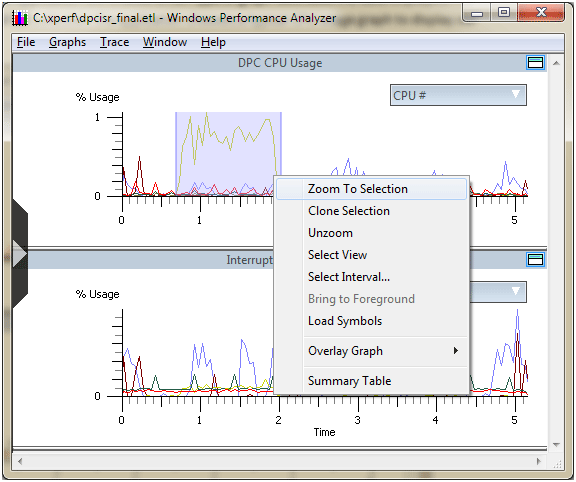
Figure 4 - Zoon to Selection
Clicking on this option will cause all graphs in the display to zoom in to that time frame, which will allow us to focus our analysis on interesting spikes such as the one that we see here.
Another interesting option available via the right click menu in XperfView is the Overlay Graph option, which allows us to merge any two graphs available on to each other. For example, Figure 5 shows howwe overlay the ISR graph on top of the DPC graph in order to see how the two relate.
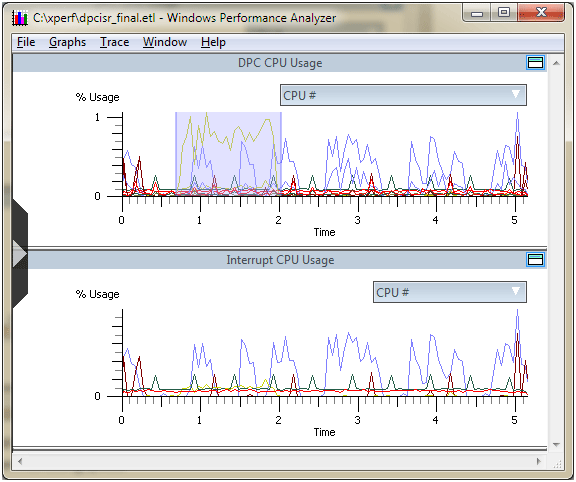
Figure 5 - Overlaying Graphs
From the same right click menu we can also choose the Summary Table option, which will take us to a new window containing detailed information about the events during that time period. However, before doing that it will benefit us to configure XperfView to download symbols for the modules loaded on the target and translate virtual addresses into actual function names.
The way we will do this is to first go to the Trace menu option and choose Configure Symbol Paths. There, we’ll want to set the symbol path to point to the Microsoft Symbol Server:
srv*c:\websymbols*http://msdl.microsoft.com/download/symbols
Note that this step can be skipped by setting your _NT_SYMBOL_PATH environment variable to the above string.
Once our symbol path is set appropriately, we return to the Trace menu and check the Load Symbols option to enact the change. We can then return to the graph view (Figure 6) and bring up the Summary Table via the right click menu.
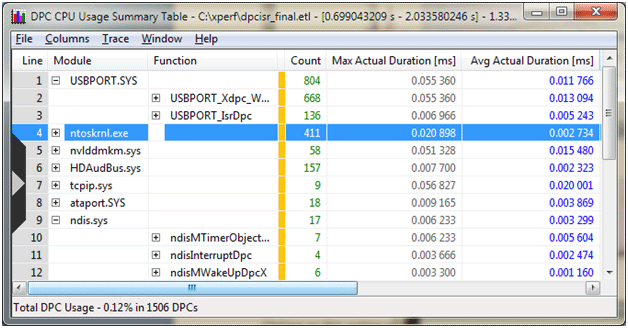
Figure 6 - Summary Table
You’ll see here that the top number of DPCs seen during the period were from the USB host controller, which makes sense considering the fact that I jiggled my USB mouse during the sample period in the hopes of generating some sort of spike in activity. We can also see the maximum DPC time, the average DPC time, and along with some other columns with more data off screen to the right. The columns shown here are configurable via the Columns menu item.
In all of the previous screen captures you will notice an arrow on the left hand side of the window. This arrow provides access to a window that allows us to show or hide the various graphs that are available from the trace. If you remember, we selected four events when starting our trace: PROC_THREAD, DPC, ISR, and LOADER. If we expand out the window by clicking the arrow we’ll notice that we have four graphs to choose from (shown in Figure 7).
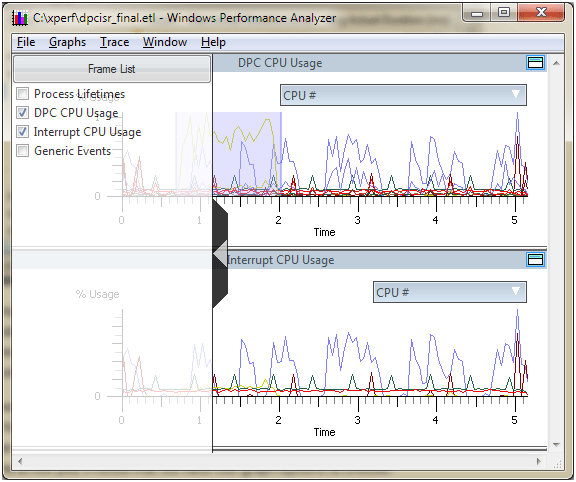
Figure 8 - Show/Hide Graphed Data
Choosing Process Lifetimes will bring up an interesting graph that shows which processes were loaded during the course of the trace. We can even see the Xperf process coming and going at the beginning and end of the trace (Figure 8).
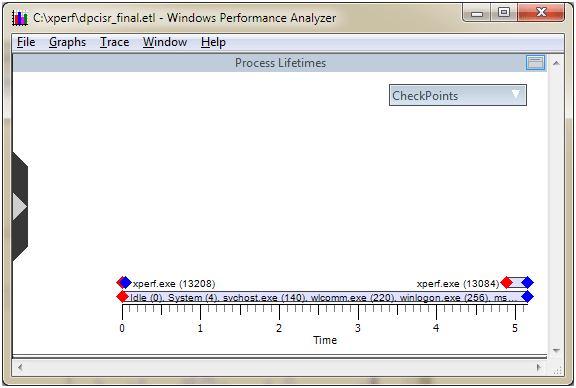
Figure 8 - Process Lifetimes
Enabling Stack Walking
A really cool feature that Xperf provides is the ability to capture stack traces of various events that occur during the trace. Stack walking is enabled by specifying the –stackwalk command and, much like the events in the previous examples, we must specify each individual event for which we want this option enabled. The list of stack walking options is too long to list here. The full list of stack walking options is available in the stack walk help:
Xperf.exe –help stackwalk
As an example, we can enable the profiling kernel event, and pair that with the profiling stack walk option:
Xperf.exe –start "NT Kernel Logger" –on PROC_THREAD+LOADER+PROFILE –f profile.etl –stackwalk Profile
Unfortunately, there doesn’t appear to be a master list of which stack walking options make sense with which kernel events. This means that the best thing to do is trial and error, just bring up the provider list with –providers kf and the stack walk list with –help stackwalk and try to come up with combinations that make sense.
Once we’ve collected our trace with the stack walking option enabled, we’ll want to make sure that we have the Load Symbols option enabled so that we can actually make sense out of the stack walks. From there, we can bring up a Summary Table of an interesting period in the trace and add the Stacks column. This gives an impressive view into the call trees of each module during the period, shown in Figure 9.
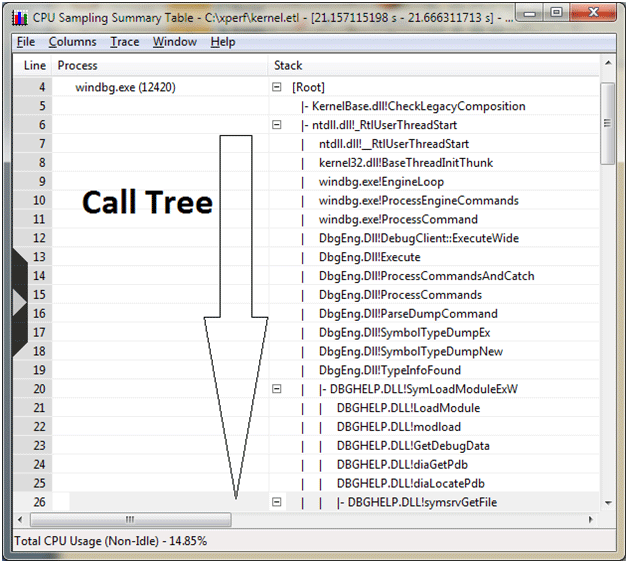
Figure 9 - Finally, Making Sense of the Data
Right clicking any entry in the call tree brings up two options: Callers and Callees. These options allow us to open new summary window with that entry presented as the root. This allows us to narrow the focus down instead of trying to sift through lots of other uninteresting call frames.
Shortcuts
Now that we’ve discussed the basics, you might want to know that there are shortcuts that can be taken to save some typing. You’ll find that many of the existing samples assume that the shortcuts are common knowledge, which can make deciphering those commands tricky if you’re not aware of them.
As mentioned previously, Xperf is mostly focused on capturing kernel mode traces. In keeping with this, if a provider name is not specified then a default of “NT Kernel Logger” is assumed. This means that our previous start and stop commands can be abbreviated to:
Xperf.exe –on PROC_THREAD+LOADER+DPC+INTERRUPT –f dpcisr.etl
Xperf.exe –stop
As another shortcut, the merge step can be incorporated with the stop command via the –dswitch:
Xperf.exe –stop –d dpcisr_final.etl
As a final round of shortcuts, the –f parameter and the –stop parameter to the above commands are also optional. Thus, you might see someone starting and stopping a kernel trace with the following:
Xperf.exe –on PROC_THREAD+LOADER+DPC+INTERRUPT
Xperf.exe –d dpcisr_final.etl
User Mode Tracing
The very last thing that we’ll discuss is how to generate a user mode trace. The commands are much the same as those for a kernel mode trace, but instead of using the “NT Kernel Logger” provider we’re simply going to make up our own provider name. In addition, instead of providing a list of events that we want to view from the provider, we simply choose all events of the provider by giving the user mode provider name as part of our –on switch. Strange, but true.
The list of user mode providers can be retrieved by executing the following command:
Xperf.exe –providers i
When I ran this command on my workstation, it showed 633 providers to choose from, so obviously I won’t list them all here. One caught my eye as amusing, so we’ll use the Microsoft-Windows-Sidebar provider and see what results we get:
Xperf.exe -start "My User Trace" -on Microsoft-Windows-Sidebar -f sidebar.etl
After then doing a sidebar related activity (adding and removing the Clock gadget in my case), stop and merge the trace:
Xperf.exe -stop "My User Trace" -d sidebar_final.etl
Firing up the resulting ETL file in XperfView results in a series of events displayed and the Summary Table view indicates the events that the sidebar provider fired during the test (See Figure 10).
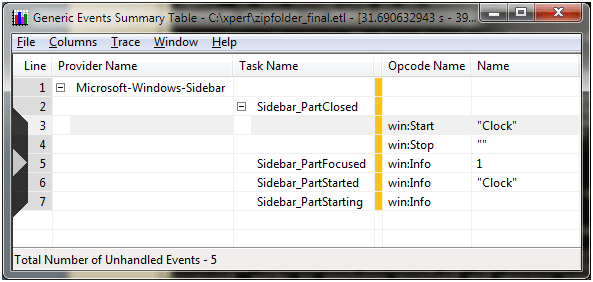
Figure 10 - User-Mode Tracing Example
Exciting stuff, huh? No, not really. Perhaps there are other providers with events that are interesting to specific debugging scenarios. Being able to merge a user trace with a kernel trace and plot them against each other would allow us to see the kernel activity during the user scenario, which is a powerful technique. In order to do that we can have both the kernel provider and a user provider collecting data at the same:
Xperf.exe –start “NT Kernel Logger” –on PROC_THREAD+LOADER+DPC+INTERRUPT –f dpcisr.etl
Xperf.exe –start "My User Trace" –on Microsoft-Windows-Sidebar –f sidebar.etl
Once the appropriate testing has been performed, we can stop both providers:
Xperf.exe –stop “NT Kernel Logger”
Xperf.exe –stop “My User Trace”
And then merge the two ETL files together into our final ETL:
Xperf.exe –merge dpcisr.etl sidebar.etl dpcisrsb_final.etl
Really Just the Beginning…
In this article, we’ve focused solely on runtime logging of performance and other events using Xperf and viewing the resulting data with XperfView. While we’ve tried to give you the basics, there are a vast number of options and other neat things that can be done with these utilities. In addition, there is an entire other utility XbootMgr for profiling boot related activities. Hopefully we’ll have more time to cover Xperf, XperfView, and XbootMgr in the future.


 Post Your Comment
