Most of you probably already know that you can include trace statements in your driver, and enable the output dynamically. This feature, available for drivers built with the Windows XP DDK and later, and supported on platforms starting with Windows 2000, is probably one of the best innovations in driver debugging since, er, WinDbg. (Aside: Yes, I understand that anything to do with WinDbg is a touchy topic, and that there still are still a few folks stuck in the Ice age, but let’s leave that aside for now.) Anyhow, tracing is a pretty good innovation. If you haven’t checked it out yet, please do so by reading Without A Trace in the Jan/Feb issue of The NT Insider (you can read the article on line at http://www.osronline.com/article.cfm?id=200).
The Old Way
One of the things that stood in the way (for a while) of our using tracing here at OSR was the tools. While TracePDB, TraceLog, and TraceFmt seem to work, it would be quite a stretch to call them “convenient.” Fortunately, Microsoft has rescued us from the inferno of command line utilities, and has given driver writers a GUI-based utility that “does it all.”
One Step to Happiness
Using a utility that’s supplied starting with the Windows Server 2003 DDK, you easily control tracing in your driver and display the trace output from your driver in “real time” in a GUI window. You can even simultaneously write the binary trace data to disk. The utility that you use to do this is named TraceView, and it’s located in DDK’s \tools\tracing directory.
Start TraceView, and select “Create a New Log Session” from under the “File” menu. The “Create New Log Session” dialog box, shown in Figure 1 below, will appear.
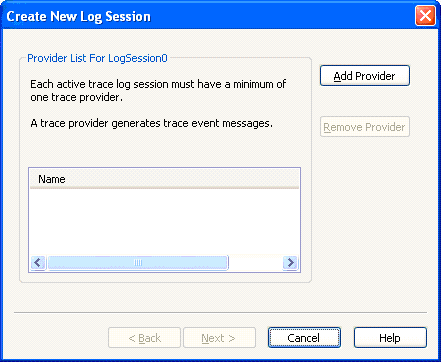
Figure 1
From the “Create New Log Session” dialog, click the “Add Provider” button. This results in the display of the “Provider GUID Control Setup” dialog, shown in Figure 2 below. In this dialog, you can manually enter the control GUID for your driver that you defined using WPP_DEFINE_GUIDS in your driver’s h file. You can type the GUID in (or just paste it), point TraceView to a file that contains the GUID, or just point TraceView to your driver’s PDB. Or, better yet, if you point TraceView to your driver’s PDB file, it will extract the driver control GUID and also all the necessary message formatting information. If you do not use a PDB file, you will next need to either select the TMF files for your driver or point TraceView to a directory that contains these files.
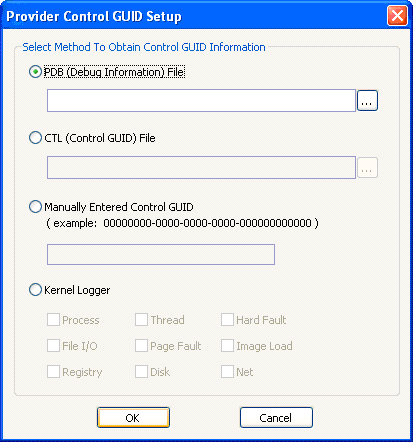
Figure 2
Once the GUID and format information has been identified, click “Next” in the “Create New log Session” dialog. You can decide where you want your driver’s trace output sent: Do you want your trace messages interpreted and displayed in real-time via TraceView’s GUI, or do you want the binary trace data to be written to a file, or perhaps both? Figure 3 shows the dialog selecting Real Time Display.
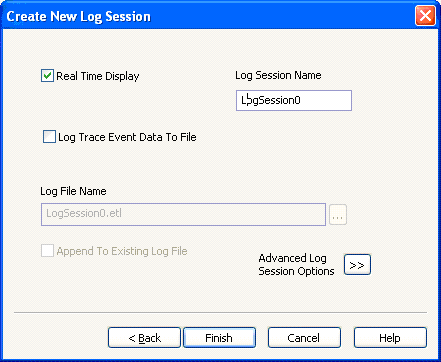
Figure 3
At this point, you can optionally click the “Advanced Log Session Options” button to request that an interpreted listing file be created, to specify which tracing messages to enable in your driver, or other such settings. By default, TraceView enables the low 16 trace messages in your driver (with a flags setting of 0xFFFF). However, you may alter this dynamically from the TraceView GUI (described later).
Once you’ve finishes specifying your trace log information, click “Finish.” The display will look similar to that shown in Figure 4.
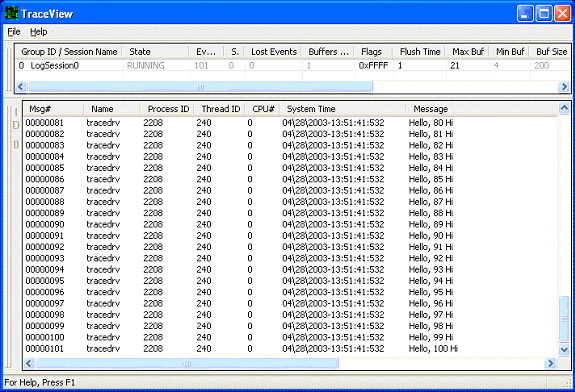
Figure 4 – The TraceView Display
Assuming you selected real time display, you’ll see two windows displayed. The upper window shows control information about each of the active trace sessions. One of the most useful things about this part of the display is that you can click and edit any of the fields that aren’t grayed-out. For example, you can click-on and change the value for “flags”, to control which trace statements generate output in your driver.
Trace messages from your driver are displayed as they are collected and output in the lower window. Note that you can re-size or re-arrange the columns in this window. You can also suppress some columns and turn other on by right clicking on the column header. Note that some columns (such as, for example, “Component Name”) will by default not have any data in them. This is to be expected. Event Tracing for Windows is very powerful, and generating data for these columns is optional under certain circumstances.
New For WinHEC 2003
You know what they say on those cheesy advertisements on late night TV here in the States, right? They say “But wait! There’s more!” You didn’t think we’d waste space in our special WinHEC issue just to talk about a DDK tool that’s available in the Windows Server 2003 DDK, right?
TraceView V2.0, Beta 1 is provided in the special release WinHEC DDK. This version of TraceView has a large number of enhancements, including:
§ Support for Windows 2000 (TraceView V1.x can only be run on Windows XP and later).
§ The ability to copy the contents of the trace output window to the clipboard.
§ The ability to save your trace settings in “workspaces”.
§ The ability to filter and dynamically color-code trace output. So, for example, you can suppress the display of certain trace events, or set the color of the trace output lines based on the trace data. This data might include the name of the function generating the trace output, the source code filename in which the module resides, or even the text of the trace message itself.
There are other enhancements in TraceView V2.0, but the ones listed above are the biggies. Filtering is probably the most powerful feature (and, thankfully, the filter settings are all saved when the workspace is saved).
Using TraceView V2.0 Filters
Figure 5 shows an example of the Manage Filters dialog, showing a fairly sophisticated set of filters.
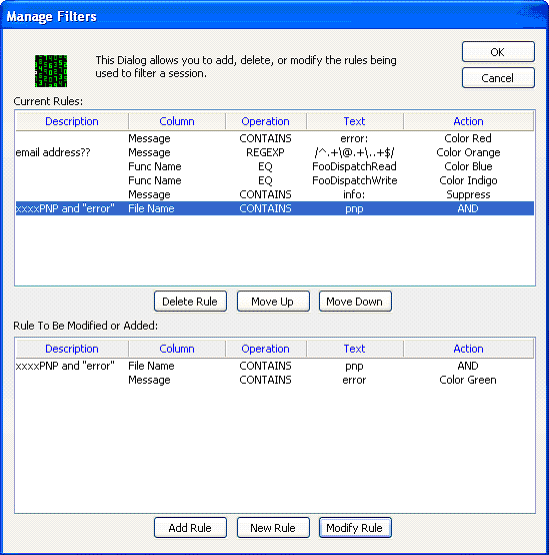
Figure 5 – Manage Filters with TraceView V2
There are three key things to know about how filters work:
- Filters are order dependent.
- Text matches are not case sensitive.
- Every filter rule contains an implicit “and terminate processing” at the end. That is, as soon as a particular trace message matches a rule, no more filter processing is performed on that message.
Looking at Figure 5, you can see we color code trace output messages based on a number of different criteria. The first is, if any trace message output contains the text “error”, that message will be displayed in red. The second filter rule contains a regular expression. If the message text matches the regular expression, that message is colored orange. This line also shows the use of the optional “Description” box in the Manage Filters dialog. It can be very helpful for adding comments that describe what a particular filter does. You can see this feature used again in the last rule. The last rule comprises a multi-line condition (we’ve selected that rule in the upper window; This results in all the lines of the rule are in the lower window). Remember, the first rule that matches stops all filtering. So, if a message has both the text “error:” and an email address, the first rule wins, and the message will be displayed in red.
In Summary
Tracing is a whole lot easier to use, and a whole lot more fun, using TraceView. You’ll find it in the \ddk\tools\tracing directory on the Windows Server 2003 DDK. A beta release of the new, more powerful, TraceView V2.0 is provided in the WinHEC DDK release. With many new features, TraceView V2.0 reaches new heights. Now there really is no reason not to support tracing in your drivers!


 Post Your Comment

